
Implementing OneFlow on GitHub, BitBucket and GitLab
This post is part of a series of articles on working with the Git source control system.
- GitFlow considered harmful
- Follow-up to 'GitFlow considered harmful'
- OneFlow – a Git branching model and workflow
- Implementing OneFlow on GitHub, BitBucket and GitLab
OneFlow is a Git workflow that I first described as an alternative to GitFlow in an article on this blog called ‘GitFlow considered harmful’ way back in 2015. Ever since that initial article, OneFlow has been used successfully by many satisfied customers.
I’ve written a follow-up post in 2017 that described OneFlow in great detail. However, I did it mirroring the original GitFlow article, and thus the descriptions used CLI commands to illustrate the various steps in the workflow. But many projects today are hosted on one of the managed Git providers like GitHub, BitBucket, or GitLab, and use concepts from those platforms, like forks and Pull Requests, to interact with the repository, rather than relying solely on the CLI.
So, in this article, I present OneFlow again, but this time assuming you’re using it with a hosted Git provider like GitHub, BitBucket or GitLab.
Table of Contents
The main branch
OneFlow always uses a single primary long-lived branch. There is a variant with two long-lived branches, but the secondary one is only ever used for tracking the latest release tag – see the OneFlow description article for details.
Traditionally, the primary branch was called master,
which was also the default in Git itself.
However, because of the negative historical connotations of that term,
main is replacing master as the new default name.
In the variant with two long-lived branches,
the name of the primary branch is traditionally develop,
which comes from GitFlow.
I will be using main as the name of the primary long-lived branch in the below description.
However, the actual name used can be anything,
and the workflow works the same,
regardless whether the name is master,
mainline, develop, or something else.
Forks
In the world of hosted Git providers like GitHub, BitBucket and GitLab, there is a concept that’s central to contributing code to projects hosted on those platforms: forks.
When you host the Git repository of your project on a server in your private corporate network, there usually isn’t a distinction between read and write permissions to that repo. It’s often the case that everyone that has network access to the given repository automatically has push permissions to it – by default, Git doesn’t include any permission model that differentiates read and write operations. The assumption is that, since the network is private to the company, having access to it automatically grants full access to any repositories hosted inside of it. And that’s usually a safe assumption with privately-hosted repositories.
However, when your repository lives in a public hosting solution like GitHub, BitBucket, or GitLab, this assumption no longer holds. Public repositories can be read by everyone, but that doesn’t mean they should be writable by everyone – that would mean the code of those projects could be changed by anyone on the Internet, which obviously wouldn’t be practical.
For a repository created using any of the managed providers, only its owner has permissions to push into that repository. They can choose to share those permissions with other users or teams, of course. The set of users who have write permissions to a given project’s repository is often referred to as its maintainers (as opposed to contributors, who only have read permissions).
But that permissions model presents a bit of an issue, as it’s important to be able to push to a repository you are working on; at the very least, you want to push the commits you created somewhere, so that your work doesn’t get lost in case your machine fails.
The hosted providers solve this problem with forks. A fork is simply a copy of a given repository, but one that lives completely in your account. The fork contains all of the commits from the default branch of the original repository at the time of creating the fork. But because this copy is placed in your account, you have push access to it.
The way this is usually set up is to have two separate
Git remotes:
one to the original repository,
usually called origin, or upstream,
and one to your fork – usually called just fork.
To make it more concrete, let’s say you want to contribute to the NodeJS open-source project. You would start by cloning the repository, which is hosted on GitHub:
$ git clone git@github.com:nodejs/node.git
The Git repository created on your local filesystem in the node
directory will have git@ github.com:nodejs/node.git as the origin remote.
After you fork the NodeJS repository in your GitHub account,
you will now need to add this fork as a second remote:
$ git remote add fork git@github.com/yourusername/node.git
(Of course, replace yourusername int the above command with your actual GitHub username)
One important note: even if you’re a maintainer of a given project,
and thus have push permissions to its repo,
I still recommend you use a fork.
The reason why is if maintainers use the main repository for their feature and backup branches,
that repository gets very messy, very quickly.
There’s really no reason that people fetching from your repository need to download all of the random branches all of the maintainers create,
many of which have not great names like adam/fix-that-stupid-bug.
If everyone uses forks for those kinds of branches,
the main repository stays clean.
Feature branches
Feature branches are where most of the day-to-day work on the project happens, and are thus the most common type of short-lived branches.
Starting a feature branch
Feature branches always start from the primary long-lived branch,
which is called main in our example:
$ git checkout -b feature/my-feature main
You can push your feature branch to your fork, so that it doesn’t get lost if your machine fails:
$ git push -u fork feature/my-feature
(The -u argument will set fork/feature/my-feature
as the tracking branch for feature/my-feature,
which means later, any time you have the feature/my-feature
branch checked out,
you can simply invoke git push
to update the latest version of the feature branch in your fork)
Updating a feature branch
To get your feature actually merged to the project,
you will need to submit a Pull Request with the contents of your feature branch
(note that GitLab calls these “Merge Requests” instead,
but other than the name, they are exactly the same).
A Pull Request is opened using the web UI of the hosted provider your project uses.
The source branch is the feature branch in your fork
(feature/my-feature in our example),
and the destination branch is the primary long-lived branch in the main repository
(main in our example) –
because of forks,
all of the hosted providers allow Pull Requests to be created across repositories this way.
A Pull Request is a proposal that you submit to the team that owns the project. It might so happen that you’re a member of that team as well! You propose to modify the code of the project according to what is in your feature branch. The maintainers perform a code review of your submission before merging it in; a Pull Request can also have automated checks, like unit tests, code coverage requirements, linters, static analysis, etc., run against your proposed changes.
While it’s possible that the team will accept your Pull Request as-is, the most common scenario is that the reviewer leaves some comments on your code, asking you to make some changes before it gets merged. In that case, you will need to make the changes locally, commit them to your feature branch, and then update your Pull Request. The way you perform that update is by pushing your feature branch to your fork again:
$ git checkout feature/my-branch
# do some work, adding more commits to the branch...

# update your Pull Request:
$ git push fork feature/my-branch

# if you used the -u option as suggested above,
# and you have the feature/my-branch checked out locally,
# you can use a shortcut:
$ git push

# if you used `git commit --amend`,
# or `git rebase -i` to edit the commits on your feature branch
# instead of creating new ones,
# you will need to force-push your branch instead:
$ git push -f fork feature/my-feature
Since it can be some time between when you submit your Pull Request, and when you get it reviewed and updated, you might also want to update your feature branch with the latest primary branch if it moved in the meantime. There are two main ways to do that, and which one you use is basically a matter of personal preference – merge, or rebase:
$ git fetch origin
$ git checkout feature/my-feature

# option 1 - merge:
$ git merge origin/main

# option 2 - rebase:
$ git rebase origin/main
Note that, if you use rebase,
you’ll have to force-push your feature branch to your fork to update the Pull Request:
git push -f fork feature/my-feature.
Finishing a feature branch
Once your submission has been approved by the team owning the project, and the automated checks all pass, the Pull Request can be merged.
There are several way a Pull Request can be integrated into the primary long-lived branch, and each of the options results in the project having a different commit history.
The method chosen here is up to you, and/or your team – the workflow works the same, regardless of which option is chosen.
Option #1 – rebase / merge --ff-only
In this option, the commits from the feature branch are rebased on top of the newest main before being merged:
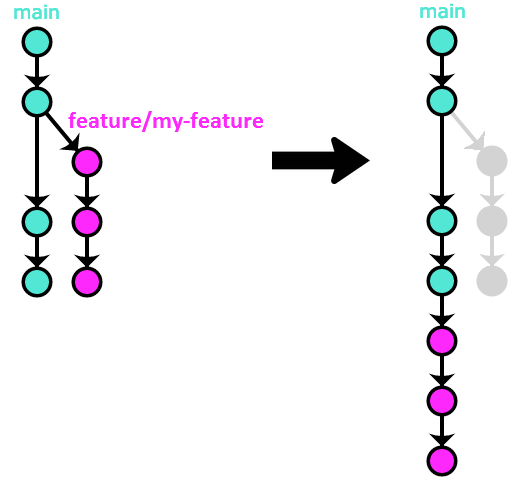
The end result is a linear history, but one that includes every commit from the Pull Request. Since a Pull Request can go through a lot of reviews before finally being accepted, I’m not a huge fan of this method, as it makes all of those commits that are created in the process of getting the PR approved part of the permanent project history, which makes it messy.
Note that neither BitBucket nor GitLab have a native “Integrate the PR using rebase” option –
instead, they have an option to merge the PR with the --ff-only flag.
The end result is the same,
you just have to make sure yourself that the PR is up-to-date with the latest main before it can get merged that way.
Option #2 – merge --squash
This variant is similar to rebase, but with one crucial distinction – all of the commits from the Pull Request get collapsed into a single commit containing all of the changes:
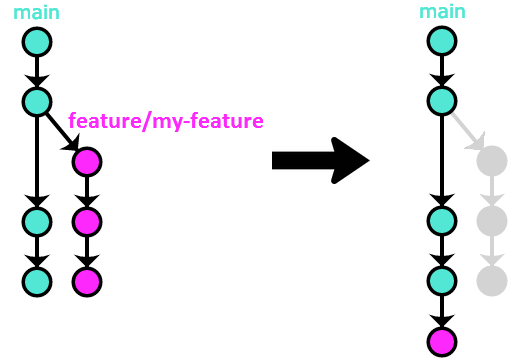
Because this method preserves linear history while also getting rid of the above problem with the rebase method (adding every single small commit from every PR to the project’s permanent history), it is my preferred method of integrating Pull Requests.
Option #3 – merge --no-ff
This is basically the GitFlow-recommended method of integrating feature branches, which always results in creating a new merge commit:
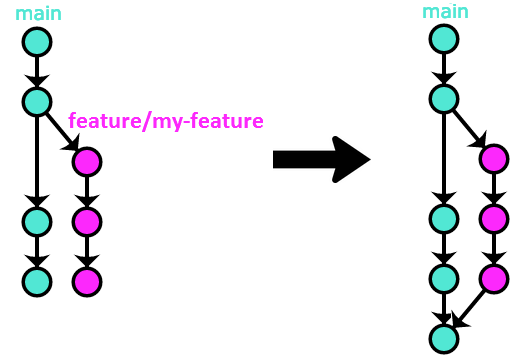
In my opinion, this method has no advantages, and very serious disadvantages (messy and unsearchable history because of the proliferation of merge commits, all the tiny commits from all of the PRs get added to the project’s permanent history), and so I wouldn’t recommend using it.
There is a special case of this method that happens when your feature branch is up-to-date with the latest main when you merge it:
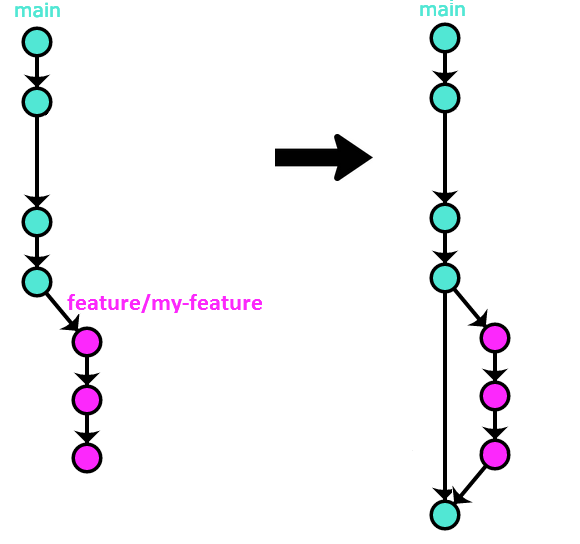
While this can result in nice history, especially if you also always update your Pull Requests in such a way that it only contains a single commit, this is a difficult method to enforce, as it requires following so many rules by all of the contributors; if at least one person breaks those rules, suddenly the project’s history becomes a mess again.
For those reasons, I recommend the “merge --squash“ variant
(Option #2) over this one.
Release branches
A release branch is where all of the work needed for preparing a new release goes. This can be as simple as bumping a version number inside a configuration file, or it might involve a long process that includes things like QA, marketing, sales, etc. However your release process looks, it can be modeled with OneFlow.
Starting a release branch
The release branch starts at whatever commit on main contains the changes you want to include in the release.
In our example,
let’s say we want to release version 2.3.0
that includes all changes up to commit with the ID 9efc5d:
$ git checkout -b release/2.3.0 9efc5d
You want to push the new branch to the upstream repository as soon as possible, so that everyone on the team knows you’re preparing a release:
$ git push origin release/2.3.0
(Since you’re preparing a release, I assume you have push permissions to the repository)
Updating a release branch
When working on the release,
you can either push to the release branch directly,
or you can open Pull Requests to it.
These work the same as Pull Requests for feature branches,
with the only difference being that the destination branch will now be the release branch,
instead of main.
Here’s an example flow of preparing to open a Pull Request for a change to a release branch:
# get the latest version of the release branch
$ git fetch origin

# create a new branch
$ git checkout -b fix-sth/release/2.3.0 origin/release-2.3.0
# work on the branch, and add commits to it...

# at some point, you're ready to open the PR
$ git push fork fix-sth/release/2.3.0
# go to the web UI of your hosting provider,
# and open a Pull Request with fix-sth/release/2.3.0 as the source branch,
# and release/2.3.0 as the destination branch
You have the same options when integrating the PR for the release branches as you have with feature branches.
I would again recommend using “merge --squash“ (Option #2),
but the workflow works the same with any method you choose.
Finishing a release branch
Once the release work is done, it’s time to tag the last commit on the branch:
$ git checkout release/2.3.0
$ git tag 2.3.0
$ git push --tags
And finally, you want to open a Pull Request merging the release changes back to main.
An important note about his PR:
do not simply open a Pull Request where the source branch is release/2.3.0,
and the destination branch is main.
The reason why is that if there are any conflicts between the two branches,
there is no good place to solve them,
as doing the conflict resolution in the Pull Request UI of your hosting provider will add commits to the source branch,
and since it’s release/2.3.0 in our case,
we definitely don’t want to do that
(you don’t want to add additional commits to the release branch after it has been tagged with the version number).
The solution to this problem is simple:
create a new branch that’s based on release/2.3.0,
and use that for the PR:
# get the latest version of the release branch
$ git fetch

# create new branch
$ git checkout -b merge-back-2.3.0 origin/release-2.3.0

# push the branch to your fork
$ git push fork merge-back-2.3.0
# go to the web UI of your hosting provider,
# and open a PR with merge-back-2.3.0 as the source branch,
# and main as the destination branch
Note that this merge-back PR should
always be integrated using the --no-ff variant
(Option #3 above),
resulting in the following history:
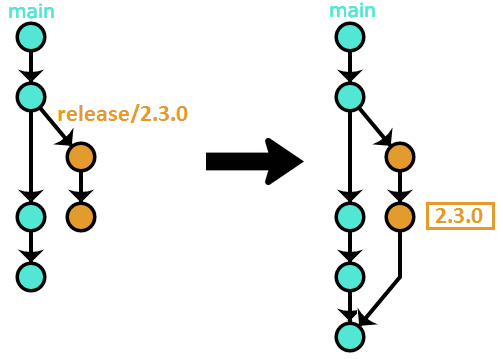
After the PR is merged, you can safely delete the release/2.3.0 branch.
Hotfix branches
Hotfix branches are very similar to release branches, but are usually reserved for emergency releases when a critical bug slipped through the regular release process.
Starting a hotfix branch
Hotfix branches start from the commit the tag of the version we are fixing points to. Continuing our release branch example:
$ git checkout -b hotfix/2.3.1 2.3.0
Updating a hotfix branch
Same as with the release branch,
when working on the hotfix,
you can either push to the branch directly,
or you can open Pull Requests for it.
These work the same as Pull Requests for feature branches,
with the only difference being that the destination branch will now be the hotfix branch,
instead of main.
Here’s an example flow of opening a Pull Request for a change to a hotfix branch:
# get the latest version of the hotfix branch
$ git fetch origin

# create a new branch
$ git checkout -b fix-sth/hotfix/2.3.1 origin/hotfix-2.3.1
# work on the branch, and add commits to it...

# at some point, you're ready to open the PR
$ git push fork fix-sth/hotfix/2.3.1
# go to the web UI of you hosting provider,
# and open a Pull Request with fix-sth/hotfix/2.3.1 as the source branch,
# and hotfix/2.3.1 as the destination branch
You have the same options when integrating the PR for the hotfix branches as you have with feature branches.
I would again recommend using “merge --squash“ (Option #2),
but the workflow works the same with any method you choose.
Finishing a hotfix branch
Once the hotfix work is done, it’s time to tag the last commit on the branch:
$ git checkout hotifx/2.3.1
$ git tag 2.3.1
$ git push --tags
And submit a merge back to the primary branch. Same as with the release branch, we use a new branch for the PR, and not the hotfix branch itself:
# get the latest version of the hotfix branch
$ git fetch

# create new branch
$ git checkout -b merge-back-2.3.1 origin/hotfix-2.3.1

# push the branch to your fork
$ git push fork merge-back-2.3.1
# go to the web UI of your hosting provider,
# and open a PR with merge-back-2.3.1 as the source branch,
# and `main` as the destination branch
We again use the --no-ff variant (Option #3 above)
when merging that PR,
just like with release branches,
resulting in the following history:
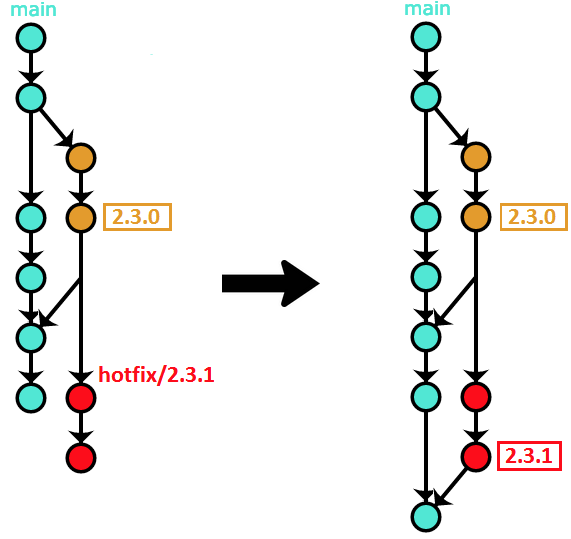
After the merge, the hotfix branch can be safely deleted.
Summary
So, this is how to use OneFlow with one of the hosted Git providers. It’s very similar to the flow described in the original OneFlow article, but has some small differences related to the peculiarities of using forks and Pull Requests.
Let me know in the comments below if the description is clear enough, or should it contain even more details!
This post is part of a series of articles on working with the Git source control system.
- GitFlow considered harmful
- Follow-up to 'GitFlow considered harmful'
- OneFlow – a Git branching model and workflow
- Implementing OneFlow on GitHub, BitBucket and GitLab